Let’s face it: homes weren’t designed with modern life in mind. Between seasonal décor, hobby gear, sentimental keepsakes, and that treadmill you swear you’ll use again, space disappears fast. That’s where self storage steps in—not as a clutter graveyard, but as a fully functional bonus room for your home.
With a little planning (and a few labels), a storage unit can become an organized, stress-free extension of your living space. Think of it as your home’s backstage area: everything you need, nothing you trip over.
Here’s how to turn your storage unit into a beautifully organized, highly usable extra room.
Step 1: Think “Room,” Not “Unit”
The biggest mindset shift? Stop treating your storage unit like a dumping ground. Instead, think of it as:
-
A walk-in closet for off-season clothing
-
A garage for tools, sports gear, or hobby supplies
-
An archive room for documents and keepsakes
-
A rotating seasonal décor headquarters
Once you assign a purpose (or a few), organization becomes easier—and way more satisfying.
Step 2: Create Zones Like a Pro Organizer
Just like your home has rooms, your storage unit should have zones. Zoning prevents chaos and saves you from the dreaded “everything must come out to find one box” situation.
Popular storage zones include:
-
Seasonal Items Zone: Holiday décor, winter coats, summer gear
-
Household Overflow Zone: Extra furniture, appliances, bulk items
-
Memory Lane Zone: Photos, keepsakes, memorabilia
-
Hobby & Recreation Zone: Sports equipment, crafts, camping gear
Pro tip: Place frequently accessed zones near the front of the unit. Items you only need once a year can live happily in the back.
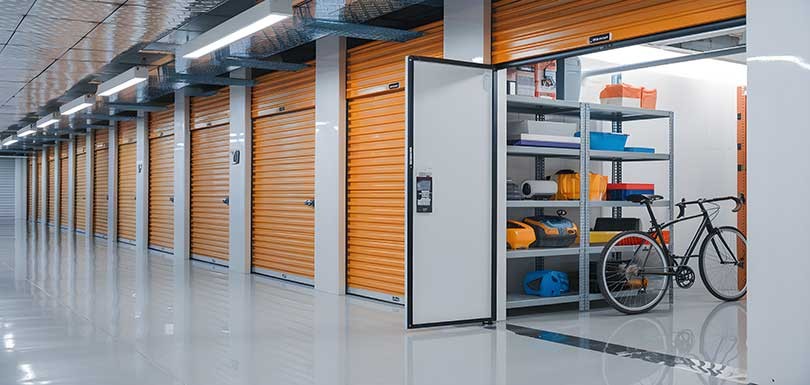
Step 3: Shelving Is Your Secret Weapon
If organization had a superhero, it would be shelving.
Vertical storage maximizes space, keeps items off the floor, and makes everything easier to see and access. Sturdy, freestanding shelving units are ideal for storage units and don’t require wall mounting.
Shelving benefits include:
-
Better visibility (no mystery boxes)
-
Improved airflow
-
Faster retrieval
-
Less stacking stress (and fewer crushed boxes)
Place heavier items on lower shelves and lighter ones up top. Your back will thank you.
Step 4: Label Like You Mean It
Labels are not optional—they’re the difference between “organized” and “guessing.”
Use large, clear labels on multiple sides of each box. Bonus points for including a brief contents list or category color-coding.
Labeling tips:
-
Be specific (“Winter Jackets & Boots,” not “Clothes”)
-
Use weather-resistant labels or clear sleeves
-
Keep a simple inventory list on your phone or notes app
Future-you will feel incredibly smug when you find exactly what you need in seconds.
Step 5: Choose Containers Wisely
Uniform, clear plastic bins are storage gold. They stack neatly, protect contents, and let you see what’s inside without opening every box.
Avoid:
-
Mismatched box sizes
-
Overfilled containers
-
Mystery bins labeled “Misc.”
This isn’t a garage sale waiting to happen—it’s a well-run system.
Step 6: Leave an Aisle (Yes, Really)
It’s tempting to pack every inch of space, but a small central aisle is a game-changer. It allows you to walk in, turn around, and actually use the space like a room.
A storage unit you can walk through = a storage unit you’ll actually maintain.
Step 7: Maintain It Like a Real Room
An organized storage unit isn’t a one-and-done project. Treat it like part of your home:
-
Do a quick refresh every season
-
Purge items you no longer need
-
Adjust zones as your lifestyle changes
Think of it as light housekeeping—with far less vacuuming.
Final Thoughts: Your Home, Expanded
A self storage unit doesn’t have to be out of sight and out of mind. With shelving, zoning, and smart labeling, it becomes a clean, organized, and incredibly useful extension of your home.
Less clutter inside. More breathing room everywhere. And zero avalanches of boxes when you open the door.
Now that’s a bonus room worth having.